I'm planning on putting up a few posts about some of the simple things we pass our Summer days doing. The unplanned, everyday, as you live things. Finding critters is probably at the top of Kaia's list, so we'll start there. She adores little things, she erupts in spastic joy the moment she discovers a little critter to investigate. We try to learn as much as we can about the critters that pass through our lives, and I have gotten quite an education in these researches right alongside her. We discuss habitat, camouflage, how many critters are beneficial to our gardens, habits, and things that make each critter unique, how they effect our lives, and, a tricky one, the food web. Not eating meat ourselves, Kaia still does not understand why many critters eat other critters to survive. I'm not sure I'll be able to explain that to her satisfaction anytime soon, but I try.
Little Katalin loves to meet all the critters, too, and Kaia loves sharing them with her. Here Kaia is showing her a tree frog.

Amphibians have got to be her favourite group. We haven't been able to find any salamanders this year, try as we might, but we have found many frogs, tree frogs, and toads. Toads we especially have in abundance around our home, and Kaia would happily carry them around, in her hands or in a bucket, all day long, talking to them, and involving them in her games, if I let her. I do let her keep them for awhile, but then explain (again, and again, day after day,) that they really would rather be let go in the garden so that they can find bugs to eat and a place to hide. I have discovered her smuggling toads into the house more than a few times.


We've found many tree frogs, and the babies are just too adorable. Quite a few hang out on our corn, for some reason, and we usually have at least one on our living room windows every night. One night we had four! Kaia never gets over their sticky little fingers, (does anyone?) or their ability to leap away from her. She can't quite hang on to them the same as she does toads.


Frogs are a whole 'nother level of tricky for her to catch, and therefor even more rewarding. This kid is impossible to peel away from a pond, and has spent many hours splashing through the water after frogs this Summer.


Caterpillars are another big hit, and we actually have two Milkweed Tiger moths and seven Monarch butterflies all in their cocoons on our mantle right now. The Tiger moths we brought in as young instars, and the seven monarch caterpillars we have now we finally brought in as four eggs, two new hatchlings, and one in chrysalis, which was in an unfortunate location. (The inside of the door on their mud pie kitchen, somewhere it certainly would not have survived had it been left, otherwise I would not have moved it.) We had some tragic experiences with the first handful of caterpillars we brought in at a later instar stage, but that is all for another post. *Ehem.* Here are just a few of the caterpillar varieties we find around our home.
Monarch Butterfly Caterpillars

Milkweed Tiger Moth

Bronzed Cutworm Moth

White Marked Tussock Moth

I'm not sure the exact name of this little guy, but I believe him to be a member of the Tiger moth family.

It is always fun to find cocoons, too, of course. Here is a Monarch chrysalis. The brown spotting is indication that this poor thing has been parasitized by Tachinid fly eggs, but we didn't know that yet.

After losing our first 7 monarch caterpillars, I was beginning to be surprised that there were any Monarch butterflies fluttering about at all! This one is a male, see the scent spots or his lower wings? That is one way to tell the difference.

Caterpillars, moths, and butterflies are not the only insects that take her interest. She loves any bug. Here are a few of the more interesting ones we have come across this Summer.
We found this stick insect on the same day that we found two different toads, a tree frog, and the Monarch chrysalis. One toad was in the grass and was pretty green, the other was in sand, and a very light tan. We talked about habitat and camouflage, it was neat to compare the two toads and for her to be able to see the way they blended better in their respective environments.

This is the first Stag Beetle Kaia had ever seen. He was a good size, and she was absolutely fascinated by him. She spent a while poking a stick near his face and watching him grasp it with those pincers.


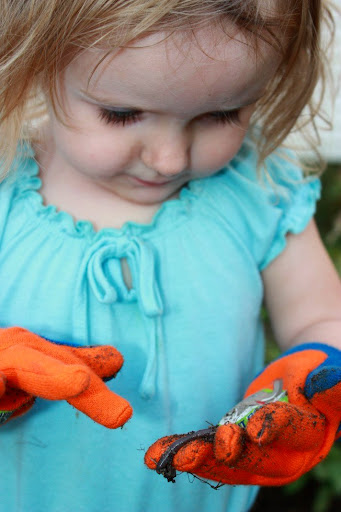
This little guy on Kaia's finger is a Ladybug larva, which I totally did not know until Kaia brought it to me asking what it was, and I had to look it up. This picture doesn't really do it justice, these things are very sweet looking!

Here she is watching the antics of an adult Ladybug.

On the left here is a Honey Bee, and on the right, a Syrphid Fly. Does a pretty good bee imitation, huh? This was another conversation about the ways critters camouflage themselves.


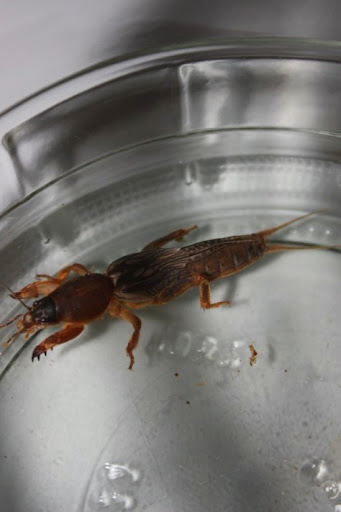
Now this one was completely new to me, and as I ran for a jar, it was fun to revisit those feelings that my 3 year old still experiences on practically every bug find. Discovery, excitement, curiosity, wonder, fascination, something new to investigate, something I had never seen before. We found it hurrying across our driveway just after dark on our way back from getting the chickens in. I was able to capture it when it unsuccessfully tried to burrow into a crack. It is a Mole Cricket, which I gather is not really a cricket at all. Would you look at those beefy arms, though? It is certainly aptly named. I didn't get a side shot of it, but those clawed front diggers look just like a mole's hands, and that is exactly what they are used for. They burrow, live in a network of tunnels, and eat grass roots.
For Kaia, though, it doesn't take something very strange and rarely seen to be exciting. You've never seen a person so thrilled to have a fly land on them. Wait, two!? Could things get any better?? ;)

The Praying Mantis is always a good catch, and another welcome garden visitor. We talk about beneficial insects and critters in our veggie gardens quite a bit.

Speaking of beneficial critters, Kaia brings every worm she finds to our veggie beds. She loves rescuing them off the driveway on rainy days.
Next up, spiders. Kaia has no fear of spiders, and so far is totally oblivious to the fact that many people do. I like spiders, too, although I get worried that she'd pick up a Black Widow if she found one. (We've found four around our house in the last couple years.) I have shown her the ones we've found and talked about never touching them. Being 3, though, I have warned her off of touching any black spiders and asked her to always tell me when she finds one. She does, and so far she has not found a Black Widow. *whew*
Here's the first Black Widow we found. She was big and plump when we caught her, and she laid her eggs that night. She's feasting on a June Bug that one of the cats ever so graciously brought in the house for us.

Kaia found this little miss in their kiddy pool and begged me to save her. I scooped her out. She's a Goldenrod Crab Spider and can change between yellow and white to camouflage herself.

This little Funnel Weaver, or Grass Spider, has built a web right in the back of one of our veggie beds. We chanced upon it when we spotted the Asparagus Beetle you see stuck in the web. We waited around to watch the spider dash out of the funnel to its prey. This was a fantastic demonstration to Kaia on what exactly I mean when I say a critter is beneficial to our garden. This spider's web was in the corner of a door frame right behind our Asparagus plants. We'd been having a plague of these Asparagus Beetles, and it was easy to see the devastation they were causing to our plants. I have explained to her many times before how beneficial critters help our garden by eating the things that eat our plants, but this was an eye-opening experience for her. So much more evident was seeing the blighted asparagus, the asparagus beetles destroying it, and the spider eating them, than any words could represent.

We found this mama Wolf Spider carrying her babies on her back while we were picking strawberries. I wish it were in better focus, but she was fast!

This little guys was on our Kale, and I have not been able to identify it yet. So if anyone knows, please share with me!

This big wolf spider was found in our house. Now, like I said, I like spiders, but this did not make me happy. I like spiders outside. This one could fill the palm of my hand.


Sometime we go to see critters. These horses are along one of the ways we walk, and Kaia always stops to talk to them. There are a couple goats there, too. Kaia desperately wants to give them all a treat, but in all the times we have stopped by there we have not yet met the care takers of these large critters, so no treats yet.

Sometimes critters come to see us. This turkey appears every year with new babies and raises them around our yard. She is mighty big, I have never seen the cats try to catch one of those babies.

And sometimes critters are brought to us. These are a few of the critters I have confiscated from the cats. I have released from them all manner of things, big birds like blue jays and robins, and numerous other little birds, rabbits, moles, voles, mice, squirrels, and so on. Yesterday, just as Kaia opened the front door to go outside, one of our cats bolted in with a chipmunk. The cat was promptly ushered outside and the chipmunk chase began.
This is a little Tufter Tit Mouse. They are so cute!

This is a Cedar Waxwing. Not the best of photos, this bird was astonishingly sleek in colour and design.

Here is Kaia saying hello to a little Deer Mouse before releasing him.

I think that is quite enough critters. What do you like to find?
Little Katalin loves to meet all the critters, too, and Kaia loves sharing them with her. Here Kaia is showing her a tree frog.

Amphibians have got to be her favourite group. We haven't been able to find any salamanders this year, try as we might, but we have found many frogs, tree frogs, and toads. Toads we especially have in abundance around our home, and Kaia would happily carry them around, in her hands or in a bucket, all day long, talking to them, and involving them in her games, if I let her. I do let her keep them for awhile, but then explain (again, and again, day after day,) that they really would rather be let go in the garden so that they can find bugs to eat and a place to hide. I have discovered her smuggling toads into the house more than a few times.


We've found many tree frogs, and the babies are just too adorable. Quite a few hang out on our corn, for some reason, and we usually have at least one on our living room windows every night. One night we had four! Kaia never gets over their sticky little fingers, (does anyone?) or their ability to leap away from her. She can't quite hang on to them the same as she does toads.


Frogs are a whole 'nother level of tricky for her to catch, and therefor even more rewarding. This kid is impossible to peel away from a pond, and has spent many hours splashing through the water after frogs this Summer.


Caterpillars are another big hit, and we actually have two Milkweed Tiger moths and seven Monarch butterflies all in their cocoons on our mantle right now. The Tiger moths we brought in as young instars, and the seven monarch caterpillars we have now we finally brought in as four eggs, two new hatchlings, and one in chrysalis, which was in an unfortunate location. (The inside of the door on their mud pie kitchen, somewhere it certainly would not have survived had it been left, otherwise I would not have moved it.) We had some tragic experiences with the first handful of caterpillars we brought in at a later instar stage, but that is all for another post. *Ehem.* Here are just a few of the caterpillar varieties we find around our home.
Monarch Butterfly Caterpillars

Milkweed Tiger Moth

Bronzed Cutworm Moth

White Marked Tussock Moth

I'm not sure the exact name of this little guy, but I believe him to be a member of the Tiger moth family.

It is always fun to find cocoons, too, of course. Here is a Monarch chrysalis. The brown spotting is indication that this poor thing has been parasitized by Tachinid fly eggs, but we didn't know that yet.

After losing our first 7 monarch caterpillars, I was beginning to be surprised that there were any Monarch butterflies fluttering about at all! This one is a male, see the scent spots or his lower wings? That is one way to tell the difference.

Caterpillars, moths, and butterflies are not the only insects that take her interest. She loves any bug. Here are a few of the more interesting ones we have come across this Summer.
We found this stick insect on the same day that we found two different toads, a tree frog, and the Monarch chrysalis. One toad was in the grass and was pretty green, the other was in sand, and a very light tan. We talked about habitat and camouflage, it was neat to compare the two toads and for her to be able to see the way they blended better in their respective environments.

This is the first Stag Beetle Kaia had ever seen. He was a good size, and she was absolutely fascinated by him. She spent a while poking a stick near his face and watching him grasp it with those pincers.


This little guy on Kaia's finger is a Ladybug larva, which I totally did not know until Kaia brought it to me asking what it was, and I had to look it up. This picture doesn't really do it justice, these things are very sweet looking!

Here she is watching the antics of an adult Ladybug.

On the left here is a Honey Bee, and on the right, a Syrphid Fly. Does a pretty good bee imitation, huh? This was another conversation about the ways critters camouflage themselves.


Now this one was completely new to me, and as I ran for a jar, it was fun to revisit those feelings that my 3 year old still experiences on practically every bug find. Discovery, excitement, curiosity, wonder, fascination, something new to investigate, something I had never seen before. We found it hurrying across our driveway just after dark on our way back from getting the chickens in. I was able to capture it when it unsuccessfully tried to burrow into a crack. It is a Mole Cricket, which I gather is not really a cricket at all. Would you look at those beefy arms, though? It is certainly aptly named. I didn't get a side shot of it, but those clawed front diggers look just like a mole's hands, and that is exactly what they are used for. They burrow, live in a network of tunnels, and eat grass roots.

For Kaia, though, it doesn't take something very strange and rarely seen to be exciting. You've never seen a person so thrilled to have a fly land on them. Wait, two!? Could things get any better?? ;)

The Praying Mantis is always a good catch, and another welcome garden visitor. We talk about beneficial insects and critters in our veggie gardens quite a bit.

Speaking of beneficial critters, Kaia brings every worm she finds to our veggie beds. She loves rescuing them off the driveway on rainy days.

Next up, spiders. Kaia has no fear of spiders, and so far is totally oblivious to the fact that many people do. I like spiders, too, although I get worried that she'd pick up a Black Widow if she found one. (We've found four around our house in the last couple years.) I have shown her the ones we've found and talked about never touching them. Being 3, though, I have warned her off of touching any black spiders and asked her to always tell me when she finds one. She does, and so far she has not found a Black Widow. *whew*
Here's the first Black Widow we found. She was big and plump when we caught her, and she laid her eggs that night. She's feasting on a June Bug that one of the cats ever so graciously brought in the house for us.

Kaia found this little miss in their kiddy pool and begged me to save her. I scooped her out. She's a Goldenrod Crab Spider and can change between yellow and white to camouflage herself.

This little Funnel Weaver, or Grass Spider, has built a web right in the back of one of our veggie beds. We chanced upon it when we spotted the Asparagus Beetle you see stuck in the web. We waited around to watch the spider dash out of the funnel to its prey. This was a fantastic demonstration to Kaia on what exactly I mean when I say a critter is beneficial to our garden. This spider's web was in the corner of a door frame right behind our Asparagus plants. We'd been having a plague of these Asparagus Beetles, and it was easy to see the devastation they were causing to our plants. I have explained to her many times before how beneficial critters help our garden by eating the things that eat our plants, but this was an eye-opening experience for her. So much more evident was seeing the blighted asparagus, the asparagus beetles destroying it, and the spider eating them, than any words could represent.

We found this mama Wolf Spider carrying her babies on her back while we were picking strawberries. I wish it were in better focus, but she was fast!

This little guys was on our Kale, and I have not been able to identify it yet. So if anyone knows, please share with me!

This big wolf spider was found in our house. Now, like I said, I like spiders, but this did not make me happy. I like spiders outside. This one could fill the palm of my hand.


Sometime we go to see critters. These horses are along one of the ways we walk, and Kaia always stops to talk to them. There are a couple goats there, too. Kaia desperately wants to give them all a treat, but in all the times we have stopped by there we have not yet met the care takers of these large critters, so no treats yet.

Sometimes critters come to see us. This turkey appears every year with new babies and raises them around our yard. She is mighty big, I have never seen the cats try to catch one of those babies.

And sometimes critters are brought to us. These are a few of the critters I have confiscated from the cats. I have released from them all manner of things, big birds like blue jays and robins, and numerous other little birds, rabbits, moles, voles, mice, squirrels, and so on. Yesterday, just as Kaia opened the front door to go outside, one of our cats bolted in with a chipmunk. The cat was promptly ushered outside and the chipmunk chase began.
This is a little Tufter Tit Mouse. They are so cute!

This is a Cedar Waxwing. Not the best of photos, this bird was astonishingly sleek in colour and design.

Here is Kaia saying hello to a little Deer Mouse before releasing him.

I think that is quite enough critters. What do you like to find?


